

HI everyone,
I made a card for one of my very dear friends who is in the process of finishing up the last courses of her degree and I wanted to make a special something on the momentous achievement - so I decided to change the shape of the card and use the beautiful Grand Labels 4 with the Grand Calibur from Spellbinders. You can not only run the Grand Labels through the Grand Calibur, but also you can run the original Spellbinders Nesties through them too! Love that convenience :)
1. Here are some pictures of a fun way to change up the shape of the card :) I used the Grand Labels 4 along with the ovals and beaded ovals nesties:

2. Using a black 12x12 sheet of cardstock, I scored at 6 inches and then at 6.5 inches. I cut the cardstock across at 6 inches and then folded the cardstock across to create a card that is 6.5 inches wide. I folded the card down and used this folded card to be cut into a new shape.

3. I positioned the smallest of the Grand Labels 4 on a sheet of red and the next bigger size I positioned it on the black cardstock - taking care to allow a little bit of the die to hang over the folded edge so that the card could still open. I kept the dies in position using some painter's tape - since I have an abundance left over from the last wall painting project :) this just helps toensure that they are in the correct position as you run it through the machine.

4. Using the instruction guid - I sandwiched the dies and papers with the proper plates (a base cutting plate and a cutting plate) and ran it through the Grand Calibur. I love that you can run two at the same time - and after I was done running these two - I ran the oval and beaded oval die through as well.

5. Here is how the dies cut the respective cardstocks... I love that it creates a fun new shape for a card (slightly bigger than an A2 width wise) and also cut a little mat to go with it at the same time.

6. I love that it also gives you such a nice embossed edge to both the card and mat in just the run through of cutting the shape. And That it can easily cut two sheets of cardstock (ex. black cardstock) so that you have a card base ready to go:

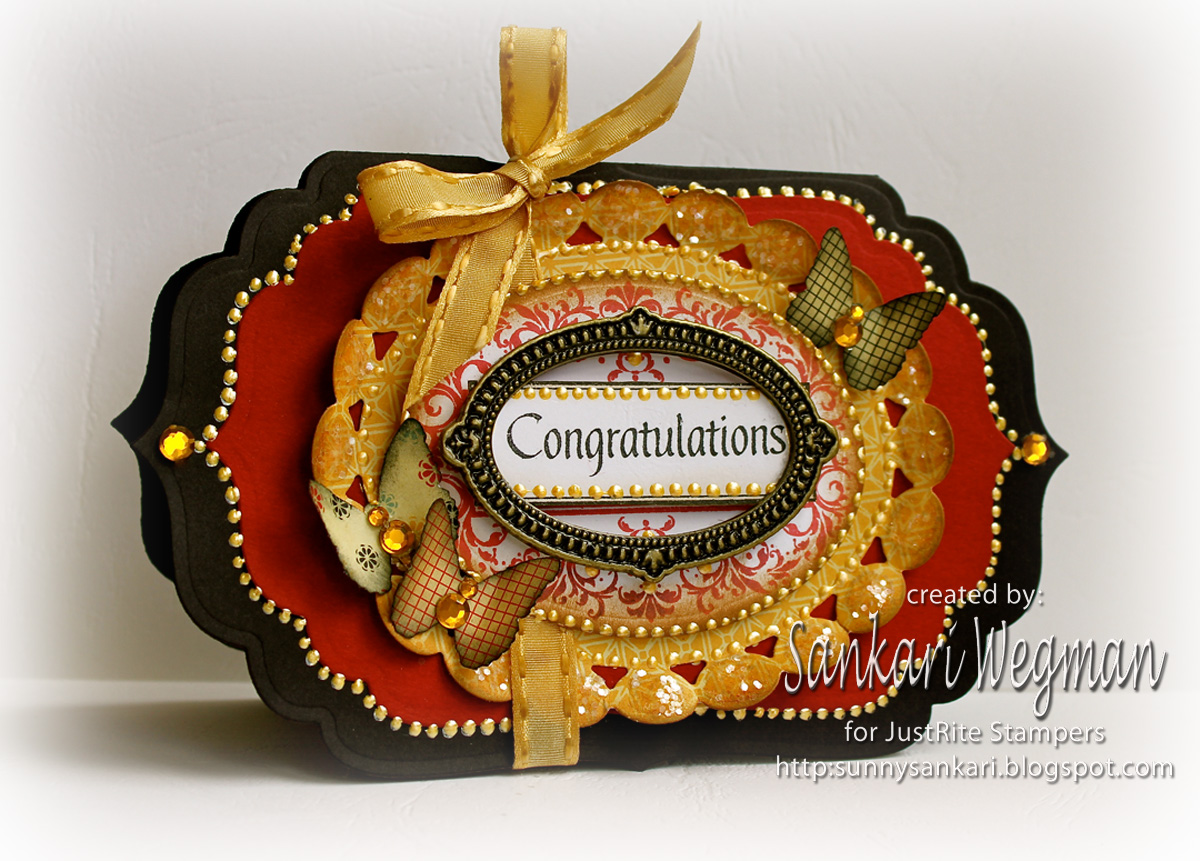
After I had the two mats (and the ovals cut out) I used the beautiful stamp set Elegant Frames stamp set from JustRite Stampers which is filled with beautiful sentiments and lovely frames and embellishments:

a. I picked the smaller frame and the paired it with the sentiment: Congratulations. I stamped the frame in LadyBug Memento Ink onto the oval cardstock that was already cut out (but usually I stamp and then cut, but in the rush, I did it kind of backwards). I stamped it again in Tuxedo Black and then cut out the sentiment for later :)
b. I adhered the oval frame to the beaded ovals shape that was cut out from the Circa 1934 paper collection (CC) and I added some glitter to the beads on the ovals
c. The beaded frame was adhered to the red Labels 4 shaped cardstock which was adhered to the black cardstock base. Taking a woven stitched ribbon I wrapped it around the different shapes and tied a bow at the top corner
d. I popped up the sentiment rectangle with some dimensionals and adhered it onto the oval frame and then finished it off with a metal oval frame from stash
e. I punched out some butterflies from Martha Stewart and then adhered them here and there onto the card with some little bling in the middle. I finished it off with some buttercup liquid pearls and added some bling onto the sides.
f. Here is a picture of the finished card:
Paper: Black cardstock from Bazzill, Red cardstock from Bazzil, DP from CC (Circa 1934)
Inks; Ladybug Red and Tuxedo Black from Memento Inks
Stamps: Elegant Frames from JustRite Stamps
Spellbinders: Grand Labels 4, Beaded Ovals, Classic Ovals
Accessories: metal frame from stash, Best Glue ever, dimensionals, glitter, Martha Steward butterfly punch, liquid pearls, yellow bling from Kaiser, ribbon (woven stitched gold ribbon from stash)
I can't wait for my friend's graduation and celebrating this huge achievement with her :) I loved making this card for her :)
Thank you so much for stopping today!
Have a wonderful Thursday!
Big hugs,
Sankari :)
PS - watch out for April Fools pranks tomorrow - I know that I have to be on guard from my DH who loves a good joke :)
9 comments:
Gorgeous card Sankari. I really love your style. Wish I could make just 1 card like yours. TFS
Just where I need to come for some motivation. I keep forgetting those dies can make great cards too! Love your layout and your use of the dies!!!
One word -stunning! You do such wonderful work. Love it.
Sankari, another stunner from you! Gorgeous card. I just LOVE your work (I know I say that each time I leave a comment, but I really really do love your style).
Absolutely fantastic!!!!
Sankari this is a wonderful card, your friend is going to love it.
Love the card all the details!!
Love the grand C!! Love it all.
Congrats with your friend!
Stunning, thankyou for doing your tutorial on the Spellbinders Grand Calibur and the LF-190. Your card is just beautiful.
GORGEOUS card! Love the rich colors, your sponged edges and liquid pearl border. It's stunning!
Hugs and smiles
Post a Comment